Posts : 173 Join date : 2020-10-31 Location : London
Subject: Phicen Blacksmith Dio Tue Nov 10, 2020 4:14 pm
Well, most of you know that while I was working on the Female Posing Guide, I was also working on a diorama for a Blacksmith. That is now completed to my satisfaction for now. I may add some more tools and things as time goes on, but I am now considering that project complete.
Here’s the main picture of the blacksmith’s workshop:
I will add to this thread over the next few days, or even weeks, depending on how quickly I can get to it, that will describe the process I took to build all the pieces, and what was made by me, or others, or even what was purchased rather than made.
Hope you like it.
BAMComix and Timz.figart like this post
BAMComix Admin
Posts : 14862 Join date : 2012-11-07 Age : 51 Location : Birmingham, England
Subject: Re: Phicen Blacksmith Dio Tue Nov 10, 2020 4:17 pm
Fantastic work Colin! It's an amazing build!
FIELD STATION 42 Admin
Posts : 3941 Join date : 2018-03-22 Location : South Central Utah, USA
Subject: Re: Phicen Blacksmith Dio Tue Nov 10, 2020 4:18 pm
This is really impressive! There is so much about this dio that I like! I've already asked you about some of it.
But... the texture on the walls! How did you do that? I love it!
_________________ ... DAVE
Kimono Troop Command French Resistance
Posts : 2114 Join date : 2020-07-25
Subject: Re: Phicen Blacksmith Dio Tue Nov 10, 2020 4:35 pm
Very impressive
Chip Deep Sea Diver
Posts : 1634 Join date : 2014-02-26
Subject: Re: Phicen Blacksmith Dio Tue Nov 10, 2020 4:39 pm
Looks great , and very interesting and different .
_________________ " There will be no Mercy ." Chip Hazard .
londonroadhog Flock Head
Posts : 173 Join date : 2020-10-31 Location : London
Subject: How to make the Phicen Blacksmith - Part 1 Tue Nov 10, 2020 4:41 pm
Description Part 1:
I decided I’d break this down as it did take me many weeks to create. This is obviously part 1... LOL.
Firstly, which I probably don’t need to describe, was the decision to do a Blacksmiths Workshop, and try to make it fairly old, so that it would fit in my friend’s and my fantasy theme. We weren’t trying to create a modern day Blacksmith.
Next was the outfit. The trousers were made, and then I made a waistcoat that would be worn when not doing Smithying. The final article of clothing was the apron.
Above it the blacksmith with his outfit (minus the apron).
The next task as a bit more of a challenge, the Forge. I wanted it to be able to be lit from underneath, so that the ‘coals’ would look as though they were lit. That was the hope anyway. So I ordered a bunch of Foam Boards. I am not sure what everyone calls these around the world, but basically they are sheets of foam with a paper-like covering over them. They are thin, these ones were 5mm in thickness.
I basically measured from the ground up to Mr Phicen’s middle area, and decided that needed to be the height. My maximum height planned was 18 inches. Why 18 inches you might ask? Well, originally I thought I’d have it contained within my Photo Cube, which has a height of 24 inches, so to give some leeway I decided on 18 inches. Also with the Phicen being around the 12 inch height, I knew I’d need some more height above him. So 18 inches it was.
I looked at various forges online, including one from the Minecraft game, and others that were pictures that google came back with. This helped me come up with a design. I figured it would need some form of chimney, and in order to keep the chimney in position, there would need to be some wall from the forge to the chimney. That pretty much gave me my design. Then it was a case of measuring and cutting out all the pieces from the form board, and using glue to stick them all together. That gave me the below image:
At this point the forge was lying on its back. Next was to see what happens when I put a tea light in the bottom of it. Plus to check the height of where the coals out be to the height of Phicens.
This highlighted a problem. I only want the light to come out from the top, not the sides of the forge. I didn’t know whether painting it would stop the light leakage or not, but continued on regardless.
Next, I needed to try to get some for of brick work on the forge. So for a test, I took a piece of foam board, and carefully pealed off the paper on one side. Then with an exacto knife, lightly scored brick lines, and then went over those lines with a scoring tool. This looked very promising:
Next I wanted to test this with a bigger off cut:
Happy with that, even with some errors with scoring. I then placed this in front of the forge to gauge whether I was happy with this.
happy with how it looked. I then proceeded to score the forge itself:
I was happy with the results, however, upon scoring the wall between the forge and the chimney I discovered that the wall was now weaker, and couldn’t hold the weight of the chimney. I had to reinforce the back of the forge wall, using some dowels and more foam board:
Once this was dry, It was time to paint. I mixed some black and white acrylic paint, to create grey and put on the first coat:
Then I mixed up a darker grey, and dabbed it onto the bricks, to appear used. Then followed the same process to add some black, to give the appearance of being used, and soot staining on the brick.
This was the main part of the forge completed.
I’ll continue on another post, as I’ve exceeded the 10 images for a post... Stay tuned...
londonroadhog Flock Head
Posts : 173 Join date : 2020-10-31 Location : London
Subject: How to make the Phicen Blacksmith - Part 2 Tue Nov 10, 2020 4:43 pm
Diorama - Part 2:
This is only a small part 2, probably more 1a. But to keep things simple, I’ll call it part 2.
Continuing with the forge. I next needed to do a couple of things. On the inside, I glued a shelf, and put more foam board around to support the shelf. The idea for this was to have a shelf to place the tea light on, rather than placing the light on the floor.
The final painting was completed by adding some metallic gunmetal grey to the chimney:
At this point I did notice that the chimney was a little off centre. However, I decided that this wouldn’t be seen.
I got some black aquarium gravel the seemed to look like miniature coal, which I thought was perfect for this. So added some to the forge, and turned on the tea light:
Ta Daa!!!! That looked pretty good in my mind. At this point, I declared the forge complete. I did order some red aquarium gravel to try to make it look more authentic, but the amazon supplier sent mixed colours instead. So I spent most of an afternoon splitting the colours up and storing them in separate zip lock bags.
You might not be able to see, but I ended up cutting a hole in the top part where the coals go, and putting a perspex cover over the hole so the light would shine better. I used some perspex from a Jiaou doll box. I knew the packaging would come in handy one day.
That’s the forge completed. This will be the end of Part 2... More to come a little later.
londonroadhog Flock Head
Posts : 173 Join date : 2020-10-31 Location : London
Subject: Hoe to make the Phicen Blacksmith - Part 3 Tue Nov 10, 2020 5:02 pm
Diorama Part 3:
I actually got in touch with a real modern day blacksmith. I was going to try to make an anvil, and the hammer, and tongs, but talking to him, I discovered he made hammers and tongs for keyrings. When we discussed the size, he said there were millimetres difference, so he could make them for me, if I wanted. So I had him make the anvil too. It did cost some money, but for the quality of the tools it was worth it.
I knew I’d need to create a tree trunk stump to put the anvil on, but couldn’t start this until I had the anvil and checked the sizes. Once it had arrived, I pulled out a tin tube that originally had a head sculpt in it, I think one of those where the eyes can move...
I liked the height of the head sculpt canister, I just needed to make it a little wider, and make it look somewhat like a tree stump. So, first step was to crumple up some foil, and hot glue it to the canister:
Next, cover it all in masking tape:
Next, to get a more tree-trunk like effect, I covered the masking tape with glue, and dipped a kitchen paper towel in glue (PVA) and then modelled it onto the canister:
Starting to look right. Once dry, onto painting. I started with black. Covered the whole thing:
The next colour was Burnt Umber. I just painted over the black, but some of the deep crevices I left black.
Then it was dry painting very lightly with a Cinnamon Brown, Then even lighter with Soft Suede. Here’s the final look:
I was happy with that result. Next part coming up...
inntruderr61 Moderator
Posts : 7857 Join date : 2012-11-27 Age : 63 Location : Pennsylvania USA
Subject: Re: Phicen Blacksmith Dio Tue Nov 10, 2020 7:26 pm
Great job londonroadhog! Very Impressive for sure!
_________________ JIM...
londonroadhog Flock Head
Posts : 173 Join date : 2020-10-31 Location : London
Subject: How to make the Phicen Blacksmith Tue Nov 10, 2020 7:31 pm
Diorama - part 4:
I found someone selling oil drums that were 1/6th scale, so I got a couple. One for this project. They were money boxes originally, and were bright yellow.
The lid was just placed on it, so I removed that. Then I needed to paint it. Following most of the colours of the tree stump, I started with black:
Of course it needed a second coat of black. Once that was on, I followed it with some burnt umber colour. But not everywhere, I wanted the black as the main colour, but wanted it to appear used, and a little rusted.
Finally, I added some of the cinnamon brown, just around the joints, to try to appear like rust.
I felt that was close enough to the effect I was looking for.
Next item was a window I wanted to create. I had some tongue depressors, coffee stir sticks and lolly sticks. I created a frame, that was just held together with cellotape (Scotchtape) for a proof of concept.
I liked the concept, so I created one and glued it together. I also used some more of that perspex cover from the Jiaou doll box, and used a sharpie to draw some leaded lights (lead between panes of glass for strength - used a lot during the World War II in houses in England - weren’t exactly bomb proof, but did protect from the blast).
I liked how this was looking, so added a tongue depressor for the window sill, and as I wanted a scene, printed off a resized image of a forrest scene. I bluetacked the scene to the frame, and this was the final result:
Last part of the window, was to place it in a wall. The wall was cut from foam board, and the size, again was depicted from (a) the photo box and (b) a tray I bought to contain the diorama floor (would limit the spread of sand/dirt/etc). I had to set the window frame up on stands until I felt the height was right based on a Phicen, before I would cut into the foam board for the window:
Once I was happy with the placement, it was then to cut and place the window....
That’s the window done. It isn’t glued, just placed. As I might want to use the other side of the wall for a different scene, so wanted this whole diorama to be double sided, and flexible.
Part 5 coming up soon.
_________________ Colin.
londonroadhog Flock Head
Posts : 173 Join date : 2020-10-31 Location : London
Subject: Re: Phicen Blacksmith Dio Tue Nov 10, 2020 7:32 pm
Hope the above image is ok. You can't see anything LOL... But I already had to remove one image as I knew that wouldn't be accepted.
londonroadhog Flock Head
Posts : 173 Join date : 2020-10-31 Location : London
Subject: How to make the Phicen Blacksmith - Part 5 Tue Nov 10, 2020 7:35 pm
Diorama - Part 5:
Now I needed to work on the walls. The walls and ceiling were all cut out, but of course nothing on them. They needed to look more like wattle and daub to be in theme. The nearest I had was some basket weave wall paper.
That will do, I thought. So I did a little wallpapering in 1/6th scale. Here’s how the walls looked after the wallpaper had dried - if you do this sort of thing, you will need to put books or weights on the walls while the wallpaper dries, otherwise the walls will bow.
The floor at the moment is just some foam. But that was the basis of the diorama. I then cut some thin strips of wood to act like oak beams:
Next task was to try to make the walls look like a used forge. So out came the black paint, as soot is black, and I dry brushed parts of the walls to look as though it had a but of soot around. The right hand wall was going to have the forge on it, so more soot was needed on that wall:
This was the first attempt, but I decided that I needed more soot around the forge:
At times I thought I had done too much, but over the next few days I noticed the paint tamed down a little. Here’s what it looked like put together at this point:
I got my sharp knife and started to hack away at the ‘beams’ as they looked too straight. Any medieval beams that you see aren’t all straight. Once I had them as I liked, I painted them in cinnamon brown (I didn’t have a lot of colours to chose from).
Then in place:
Getting a lot closer.
I knew I’d need some tools, so I took some dowels, and twisted some wire around them, and wrapped foil around the wire to give the appearance of tools.
I made a Pick Axe, Spade, Pitch Fork and Coal shovel in the same way (Pitch fork didn’t need the foil).
Then I painted them all in the Metallic Gunmetal Grey.
Next up, I needed to make the worktable/bench. That’s coming up in part 6.
londonroadhog Flock Head
Posts : 173 Join date : 2020-10-31 Location : London
Subject: How to make the Phicen Blacksmith - Part 6 Tue Nov 10, 2020 7:37 pm
Diorama - Part 6
The worktable/bench. Again, this was constructed of foam board. Sizes were loosely based on one of my tables in the attic. But the design was out of my head.
As I wanted this workbench to be quite strong, I backed the top with cardboard (this was actually one of the amazon envelope cards cut to size). This time, I stripped the paper from the parts before I attached them together. I also scored out the drawers before glueing too, just so I didn’t break the table trying to do this once it was put together. The legs too had card in between two pieces of foam board.
Once everything was dry, I used polyfilla (generic wall filler) to fill in the gaps, and smooth the legs and joints. Then when that was dry it was a case of sanding everything.
Next time for painting. First black.
I needed the black to get into the grooves of the scored drawers, and to kind of create a grain to give the wood appearance. Next Burnt Umber came back into play:
I also added a little bit of Cinnamon Brown and tiny amounts of Soft Suede. Next was to glue on some grommets, and two bead headed pins for the drawer knobs.
Workbench completed.
Using those coffee sticks and lolly sticks, I created a tool rack, and painted it:
Next. Putting it all together - Part 7
londonroadhog Flock Head
Posts : 173 Join date : 2020-10-31 Location : London
Subject: How to make the Phicen Blacksmith - Part 7 - Putting it together Tue Nov 10, 2020 7:40 pm
Diorama - Part 7
Putting it all together:
I went onto Amazon and got some magic sand. Weird stuff! It sticks to itself, and is very easy to clean up, unlike normal sand.
So, I put a board down on the black tray over the foam for the base. Then put the walls together using masking tape (warning, this can strip the paper off of the back of foam board) to hold the walls in place, and put the ceiling on in the same way. Added the beams, these are held in place with tension rather than anything permanent. Next it was time to put a thin layer of sand onto the ground.
Once the sand was in place here’s the look:
I like the way it looks as though there are loads of footprints all over it. Next place items in the diorama where I want them:
Adding more and more, until everything is in place:
This was taken with a fisheye lens. The lights weren’t placed correctly, but at least you get the idea. The lamps were got from ebay, as were the buckets. Any swords were from other purchases. Horseshoes on the walls were created by bending wire. To put them on the walls temporarily, I bent a pin over, and pushed it into the wall.
The lighting for this is in the next image:
It was all lit by lights called Lume Cubes. They are small, but bright, and can be controlled via a mobile app. The one by the window was down to 15% power, and the two on top of each other, that were trying to simulate the sun were on 80%. They also had a warming 4 filter on each one, to try to simulate a sunset. The barrel was filled with black aquarium gravel, and in the base of the forge, and on the internal shelf were a total of 7 tea lights. The swords were kept in place with tiny pieces of bluetac.
Once several images were taken, they were loaded into Adobe Lightroom, and a little bit of manipulation to make the lanterns appear alight, darken the left wall a little as it did look too white. Then into Photoshop to add a little motion blur to the Blacksmith’s right arm, and hammer. Then finally add a spark to the hammer/sword connection.
That then gave me the final image that started this thread.
Hope you found this helpful. Please let me know if you need any further information.
JohnnyE4 Red Devil
Posts : 915 Join date : 2016-03-31 Age : 60 Location : Oklahoma
Subject: Re: Phicen Blacksmith Dio Tue Nov 10, 2020 10:34 pm
nice forge I made a trough to quench the hot steel in mine to keep it in a Viking theme
Chip Deep Sea Diver
Posts : 1634 Join date : 2014-02-26
Subject: Re: Phicen Blacksmith Dio Tue Nov 10, 2020 10:54 pm
That has to be one of the best tutorials I have ever seen . Great stuff indeed , well done Colin . I think an added trough as suggested would be good .
_________________ " There will be no Mercy ." Chip Hazard .
Professor Gangrene Fan Moderator
Posts : 10634 Join date : 2012-11-11
Subject: Re: Phicen Blacksmith Dio Tue Nov 10, 2020 11:06 pm
Thanks for doing the break down and descriptions how you created the blacksmith dio. I think you totally need to kitbash a female blacksmith .
_________________ I’m Dedicated to serving Professor Gangrene as One of His Loyal Minions.
londonroadhog Flock Head
Posts : 173 Join date : 2020-10-31 Location : London
Subject: Re: Phicen Blacksmith Dio Tue Nov 10, 2020 11:17 pm
Thanks guys for the nice comments. Yes, a trough was an omission. If I make it up again, I’ll have to include one.
As for female kitbash of a blacksmith. Hmmm. The S22A, S23B would be a great body for that. However, clothing for her might be a bit interesting... What do you think? Perhaps a Leather bikini... LOL
Professor Gangrene Fan Moderator
Posts : 10634 Join date : 2012-11-11
Subject: Re: Phicen Blacksmith Dio Tue Nov 10, 2020 11:30 pm
londonroadhog wrote:
Thanks guys for the nice comments. Yes, a trough was an omission. If I make it up again, I’ll have to include one.
As for female kitbash of a blacksmith. Hmmm. The S22A, S23B would be a great body for that. However, clothing for her might be a bit interesting... What do you think? Perhaps a Leather bikini... LOL
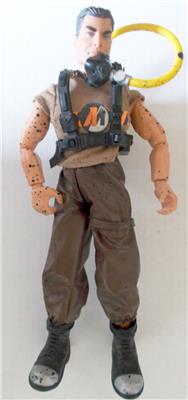
I was actually thinking you could use the brown leather trousers from a mam set called Driller Extreme for the female blacksmith trousers and definitely wasn’t thinking of a leather bikini. Image is coped from The Action Figure Archive Modern Action Man section.
_________________ I’m Dedicated to serving Professor Gangrene as One of His Loyal Minions.
RealSarahdactyl likes this post
FIELD STATION 42 Admin
Posts : 3941 Join date : 2018-03-22 Location : South Central Utah, USA
Subject: Re: Phicen Blacksmith Dio Wed Nov 11, 2020 12:05 am
Thank you for sharing this phenomenally detailed tutorial! Several of your solutions were quite clever, and the final result is indeed impressive!
You are a scale artist of considerable skill and talent!
I must admit being somewhat envious of your array of craft-making tools, the spring clamps and weighted blocks and such! I am sure that having good tools, and a space in which to use them, makes the process more enjoyable, as well as aiding efficiency.
Thanks, in particular, for sharing the "trick" behind making the coals appear to glow!
I will be revisiting this tutorial regularly to try to ingrain some of these techniques in to my brain!
_________________ ... DAVE
Last edited by SCU_HQ on Wed Nov 11, 2020 12:48 am; edited 1 time in total
Guest Guest
Subject: Re: Phicen Blacksmith Dio Wed Nov 11, 2020 12:37 am
Very much enjoyed the whole "how-to",....although I'm not sure what that naked chick was doing wandering about!
Having worked in a smithie on a farm as a young child, my job was to work the huge leather bellows via a long pole. Perhaps you could consider adding a bellows as they are necessary to gain the heat required?
Wolf_Soldier64 Moderator
Posts : 2476 Join date : 2012-11-12 Age : 59 Location : Reading, Berkshire
Subject: Re: Phicen Blacksmith Dio Wed Nov 11, 2020 8:45 pm
Wow Colin superb upload very impressive dio, I'll look forward to seeing more of your work
_________________ Its better to Burn out than fade away
gibri Admin
Posts : 2684 Join date : 2013-02-21 Age : 69 Location : Mishawaka, Indiana United States
Subject: Re: Phicen Blacksmith Dio Wed Nov 11, 2020 8:57 pm
Brilliant work!!!
I really enjoyed taking my time looking through your pics.
I do like the girls, but these male Phicen figures can be used to great effect.
RealSarahdactyl Action Sailor
Posts : 495 Join date : 2020-07-30
Subject: Re: Phicen Blacksmith Dio Fri Nov 13, 2020 8:39 am
I think I may have missed the indepth build post on MWD. This is exceptional work Colin! So well done!
RealSarahdactyl Action Sailor
Posts : 495 Join date : 2020-07-30
Subject: Re: Phicen Blacksmith Dio Fri Nov 13, 2020 8:41 am
Prof Gangrene Fan wrote:
londonroadhog wrote:
Thanks guys for the nice comments. Yes, a trough was an omission. If I make it up again, I’ll have to include one.
As for female kitbash of a blacksmith. Hmmm. The S22A, S23B would be a great body for that. However, clothing for her might be a bit interesting... What do you think? Perhaps a Leather bikini... LOL
I was actually thinking you could use the brown leather trousers from a mam set called Driller Extreme for the female blacksmith trousers and definitely wasn’t thinking of a leather bikini. Image is coped from The Action Figure Archive Modern Action Man section.
This Action Man was my favourite figure/doll growing up. My grandparents bought it for me. I remember the speckled black paint he was covered in that was like mud from the mine or whatever seeming so impressive to me.